Announcement

Collapse
No announcement yet.

Illuminated Cup Holder & Int LEDs installed at last & speakers fitted in the doors

Collapse
X
  • Filter
  • Time
  • Show
Clear All
new posts

  • Illuminated Cup Holder & Int LEDs installed at last & speakers fitted in the doors

    So after now almost finishing my lighting install into the car to help make night driving better and more more fun. Ive finally finished most of it. The only thing remaining is the spot lights in the boot which I will do in the next few days when I fit the Auto dimming mirror and compass. It has made a huge difference to the inside of the car and much more inviting. Hopefully it will give some others out there some ideas as well! Enjoy.

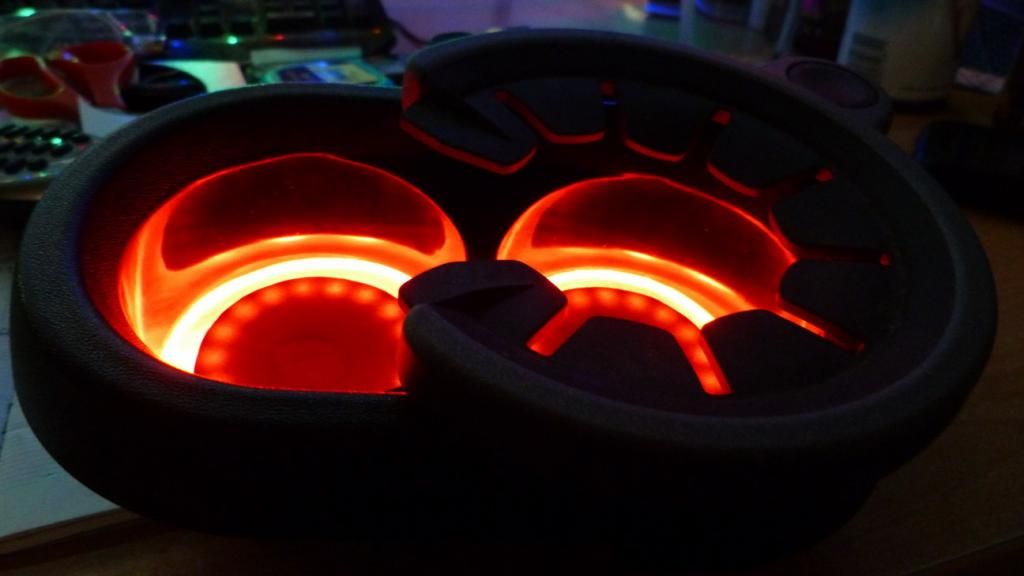
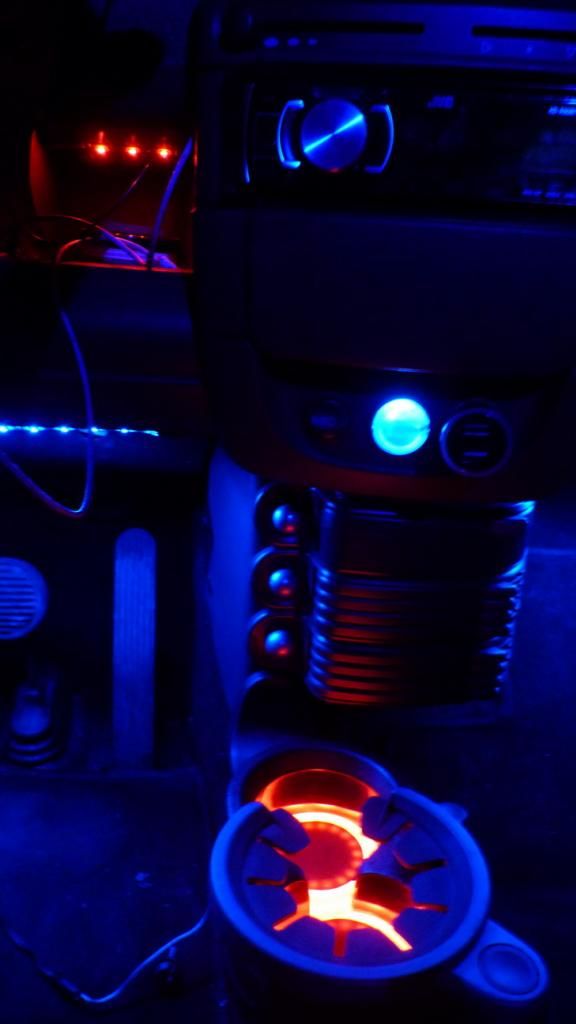
    The Cup holder I did today. A piece of plexiglass and some 60mm circular LED rings and a lot of time cutting and shaping, but this is the result. (I will probably add in a dimmer for the Cupholder soon)


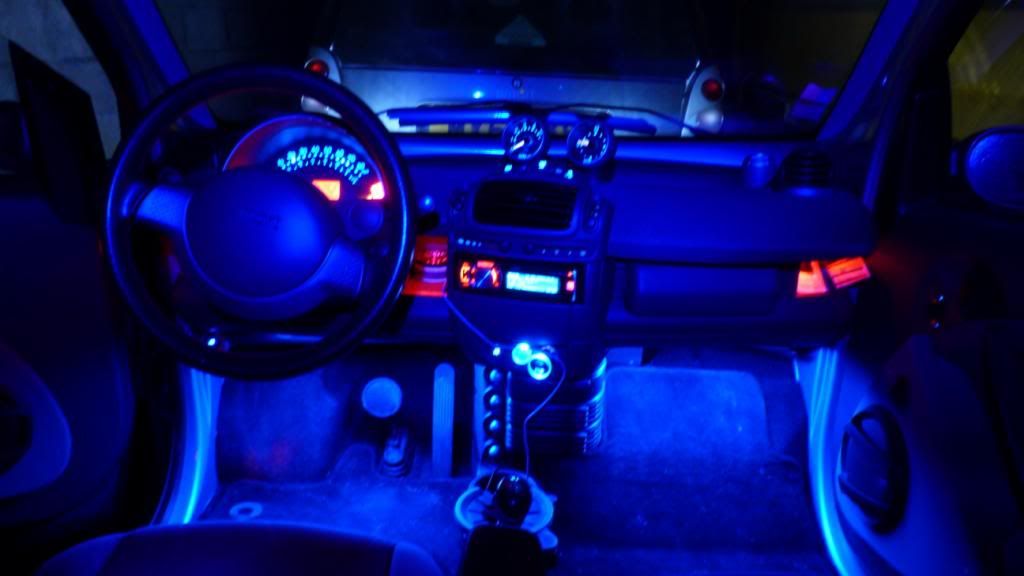
    These were the lights as I installed them a while back with the underdash LEDs in Red and blue, converted all the switches and added back lighting to the door handles and window switches. I even added lighting into the dash drawer so I can see whats in there at night! What a major difference that makes, you would have to fit some to find out.


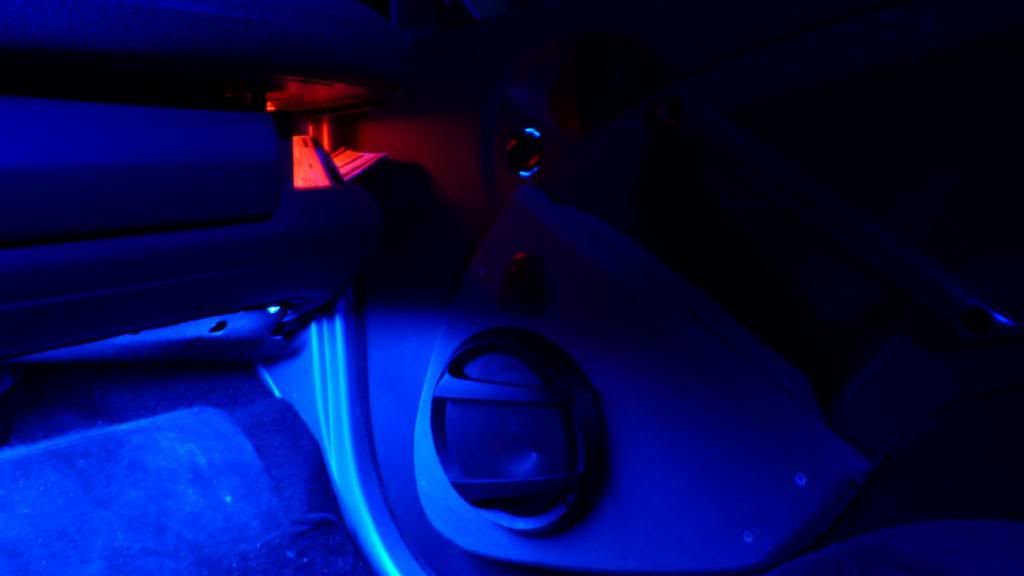
    Finally the Speakers fitted into the door using the time honoured method covered with a fabric almost exactly the same colour as the rest of the inside of the car. Getting the right colour took me forever in a material shop, but there was a positive... the ladies were woooweee.... definitely the place to meet women! If I had been in England I would bet my bottom dollar that they would have all been Grannies! lol. Not in France


    After the release of the fugly new smart! If you dont mind Ill just make my good looking 450 the best it can be. lol
    Last edited by cougar7609; 16-07-14, 08:59 PM.

  • #2
    Wow those cup holders plus the rubber grippers look like fighter jet engines! Looks great, how do the door speakers sound sat alongside the existing fronts then. I've got mine fitted just need to run the wires.

    Comment


    • cougar7609
      cougar7609 commented
      Editing a comment
      Lol you are right! I hadnt seen that when I looked at them, the afterburner cup holders Ill have to call them. The speakers sound pretty damn good, much better than I was expecting. I used a sheet of floor soundproofing (the stuff you buy in square sheets for placing under laminate flooring) behind a piece of chipboard about 3/4" thick as the speakers were hefty speakers and had quite a depth. I added the sound proofing to add a richer bass sound and it worked a treat! I used Juice Orange speakers which came as a kit with the tweeters and crossover. I ran the router around the edge to give that smooth appearance that blends into the pocket.

  • #3
    That looks great!

    Any chance you could post up a parts list and some diagrams so others can pirate your work ? :-)

    Comment


    • cougar7609
      cougar7609 commented
      Editing a comment
      First of all you need to have a 451 cup holder, the 450 cup holder is different. It fits directly out of the box with no modifications. Next I ordered some plexiglass 8mm thick. Then some LED rings 60mm diameter from china. Total cost just over a tenner for the rings and the plexiglass.

      Then I made a template to fit the cup holder internals in cardboard. Dimensions were 160mm x 78mm then I found a bottle of wine that fitted perfectly in the cup holder and use that to draw the circles leaving the center of the card blank and then I measured the middle smallest section and how long it was and transferred that to the template. Cut all of that out and checked it fitted. Fitted like a glove! So I then transferred that to the plexiglass and cut it out using my small band saw. Smoothed it all down with my grinding station (fine grit) Then checked it for fit.

      Smoothed it down some more, got it perfect and then put the LED rings on and centered them and drew round them. I then took it to my bench drill and drilled down 4mm and then changed the drill for a cutting drill bit and set the drill into the hole at the right depth and then proceeded to slowly route out the channel for the LED rings.

      Once that was done I took the cup holder apart and measured where I needed to drill on both parts for the wires at both ends. Drilled them in checked it fitted with the wires and then I took my belt sander and using a fine grit sandpaper buffed up the visible side of the plexiglass so it became opaque. Then I fitted the rings in and ran the wires down the grooves I had cut then taped the back of them into the central section of plexiglass so it cant be seen.

      Put a blob of glue on the connections of the rings to waterproof them in case of spillage in the cup holder. Then I took some black plastic from a cheap stationary folder made of soft pliable plastic and cut it using the template from one of the rings then I glued with contact adhesive the discs of plastic over where the rings sat underneath. Then I fed the wires through the cup holder and fitted everything into place.

      I then ran the wires where I needed them to go towards the centre front of the car and soldered the wires from the furthest ring to the wires of the closest ring. Soldered some wires onto the now single pair of wires so that they were long enough and plumbed them up through the console to the stereo connections and soldered one to ground and the other to the lighting connection for the stereo and hey presto the cup holders were done!

      I bet you want to know how I did all the other lights... but you'll have to ask if you do! lol

  • #4
    Originally posted by Bill View Post
    Wow those cup holders plus the rubber grippers look like fighter jet engines! Looks great, how do the door speakers sound sat alongside the existing fronts then. I've got mine fitted just need to run the wires.
    Cool thanks for the feedback. I've got component vibes up front and now vibe coaxials for the doors, just need the time to do the cable run (kids) lol Here's mine, though it did the easy option

    Comment


    • cougar7609
      cougar7609 commented
      Editing a comment
      Are those the pre-moulded speaker holders? Wheres the top to the pockets? Do they come with them? You will definitely need the tops or something to cover the top section or the sound will cancel out and the speakers will sound awful. If you want to put tweeters as an addon I would cut and mould the mirror adjuster covers and place them in there. A little bit of fibreglass would do it, but it will take time. They do look good. Do the pockets have any sound proofing behind the pocket? That is important if you want to get a smooth bass sound.

      PS I want that switch and cover to the side of the gear stick! Ive got to source one from somewhere. Theres some idiot selling the whole thing for £35 on fleabay but the parts brand new are £32 so why anyone would buy it Ive no idea.
      Last edited by cougar7609; 17-07-14, 11:11 AM.

  • #5
    The next perplexing mod I want to do is to take the key surround which originally glowed in the dark and after 13yrs has now has lost its glow and fabricate from some plexiglass an opaque one which I can light with some more LEDs then etch out the numbers 0 1 and 2 and paint them so they stand out against the backlight. So I can see that in the dark

    I have already taken one of the gear knobs apart and have worked out a way of running a wire in the center to put an LED under the diagram. The only problem is that the diagram is painted on underneath the clear plastic and requires a very steady hand to etch off the black paint so it can be painted in glass paint so the light will show through. But this mod is far far far off in the future. lol

    Long long long after I get the kit for the extra window switch and convert a cabrio roof switch and housing to function as the new window switch so its next to the gear stick and within easy reach without drilling the door panel and plonking in the supplied switch which doesnt match properly with the originals. Using the cabrio switch is perfect as it looks like a smart fitment
    Last edited by cougar7609; 17-07-14, 12:45 AM.

    Comment


    • #6
      Yeh not doing high level tweeters as they're just not needed with dash mount tweeters I have. The speakers mounts are a really good tight fit against the door card so will try them before adding materials behind. The tops aren't open they are reassessed with small storage areas for phones or sunglasses etc Over all very happy with them, good colour and plastic match

      Comment


      • cougar7609
        cougar7609 commented
        Editing a comment
        Ahhh I see, I thought about doing that as well when I made mine, but knowing how speakers work, I decided not to as you require as large a space behind the speaker as possible in order to produce good sound. Were these the ones they advertise on ebay for £75? I even made mine bigger than the original pocket dimensions by raising them up towards the door handle for this very reason. I will be interested to hear how they sound. Can you let me know when you get them wired in? I fitted one of the vauxhall corsa sunglasses holders up next to the mirror so I solved the problem of no where to put sunglasses

    • #7
      Will be sure to post up about it bud. They are the same as the £75 ones yes, but I plumped for the empty ones at £59 as I had the vibes already for this job.

      Comment

      Ad Widget

      Collapse
      Working...
      X