An amateur I see. Cutting pipes rather than spending a second or two releasing hose clips is not what I call smart. Makes you wonder where else you have cocked up.
-
-
-
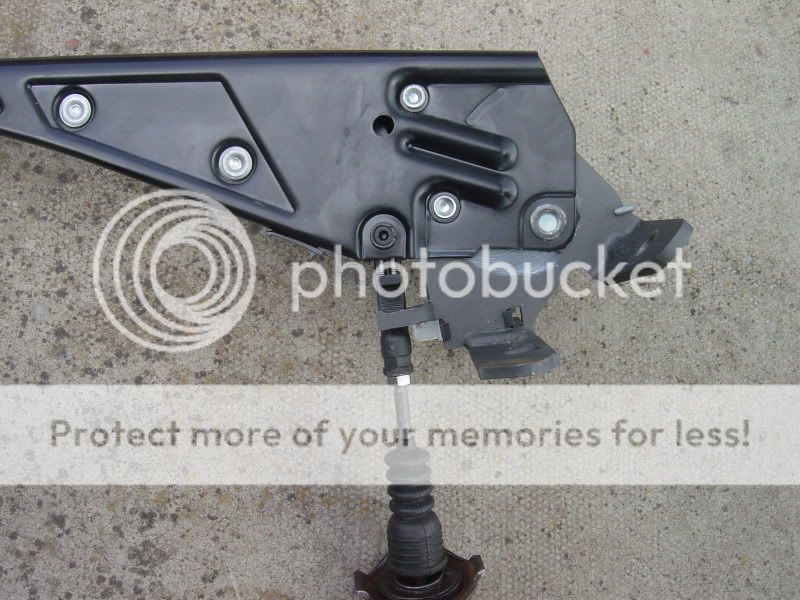
Fuel rail pipes now sorted, But this.....
Originally posted by Thrumbleux View Post,,,,,this is the pipe FQ101 call the 'fuel tank air line' , the one that clips onto the inlet manifold branches and is teed into two pipes. Where do the two ends go? One to the the TIK (I think) - the other?Originally posted by Thrumbleux View PostComment
-
Brake servo vacuum pipe and top engine breather pipe. You can easily cut those off with your Stanley knife.Comment
-
Originally posted by Thrumbleux View Post
I think the one you describe is facing you as you look at the car and there's a blue valve or connector somewhere on it - one end does I think go to the tik and the shorter one goes down to a black plstic solenoid valve cliped on to one of the ignition coils - there is only one pipe connected to this solenoid as it just ventsto atmosphere.Comment
-
Bigger bore than those ones - which I also had to retrieve from under the intake manifold.
The pipe in question from the fuel tank tees into two and one leads to the TIK and the other to the vac side of the throttle body (rear and low). -
I think that must be the vacuum servo pipe - normally disconnected via the union next to where it's clipped along the top of the inlet manifold.
-
-
Can anyone please remind me where the axle needs to be to re-fit the transverse location arms? Is it low or does it need to be jacked nearly supporting the car's weight to get the arms to line up? I suspect the latter (I can never remember) but on jacking it was just lifting the (still lowered) subframe.
Working on that car is like a 1000 piece jigsaw with each piece having a number 1 to 1000 on the back indicating the sequence in which it must be added to the puzzle. Put a piece in out of sequence and it'll have to come out to re-enable the sequence. Except with the smart - there's no numbers to follow....Comment
-
Downwards right enough then.
When I get it right (with K-bar still attached to subframe) - it's a breeze. I'll either try with the springs removed - or wait until the subframe is raised again. Almost there!Last edited by Thrumbleux; 06-12-16, 05:55 PM.Comment
-
Raise subframe in stages. Make sure rack for hand brake auto adjuster faces to port and guide it into female slot at base of hand brake lever. Fit subframe bolts. Observe tightening sequence: Port forward first, followed by starboard forward and either of the rear bolts last.
Note that large spring mechanism (not the small return spring) at lower end of rack auto adjuster tends to seize solid due to exposure to the elements. Wet in penetration oil and lube oil now whilst access is good.
Make sure rear axle is suspended by shock absorbers. Fit drive shafts. Easy to damage inboard boot on short drive shaft if rear axle is not suspended by shocks.
Fit X frame loosely to subframe. Place jack under end of rear axle tube, jack up axle tube and connect X frame arm. Do other side same way. Two jacks are sometimes needed. Torque up X frame arm bolts and nuts once rear end is resting on the ground.Last edited by tolsen; 06-12-16, 09:10 PM.
-
-
Good news - it runs. And selects gears. Didn't get to drive it as the subframe will have to be dropped again to get the handbrake mechanism into place (previously it aligned itself but not this time - dammit!) as per TK's instruction.
Pretty rough when it first started but running and idling sweetly now. Subframe tomorrow along with a few other little bits and bobs (guards, arch liners, etc) and I'll be back on the road again.
I'm assuming I'm finished so I'll take the opportunity to thank all those who positively contributed to this thread and helped me along the way - your help is much appreciated - thanks.Comment
-
One last (hopefully!) question. In the region of the inlet manifold I have an spade connector in a bright green plastic case but nothing to connect it to. I don't recall detaching it so suspect it is surplus to requirements. Any idea what it's for? Air con?Comment
-
It's for the Air Conditioning system as you suspected.
JohnComment
-
Post a photo or two of the car please. Can't ever recall having seen yours. Glad you're on the home run.Comment
-
Help!
I cant get the handbrake mechanism to line up on raising the subframe.
I'm pushing it over to the left, can feel the point where it can no longer swing to the right, then within a half inch of the subframe being in its final position the handbrake lever starts to rise and neither then or when subframe is fully raised does the lever connect.
I didn't have this problem when I previously dropped the subframe so why now? All I can add is that yesterday when I missed the engagement, the HB lever was pushed up quite a bit.
What do I have to do to get this damned thing to engage? Just how far to the left does it have to be? Is fore and aft of any importance?Comment
-
Rack has to face left. I said nothing about pushing it to the left.
Comment
-
Very true.Originally posted by tolsen View Post
What shape/form is the other side of the rack? (to aid identifying orientation as accessing the rack part with subframe not fully lowered is compromised)
Of the three coolant pipes, how many should be to the left (viewed from the rear) of the handbrake mechanism?Last edited by Thrumbleux; 09-12-16, 08:02 AM.Comment
-
You get access to the hand brake rack from top via engine compartment hatch. You also have access from below. Rack side should face to port. Other side of rack to starboard if you ken fit I mean as they say here. Other side of rack looks like a flat bar but has a ridge running all the way along its middle.
Coolant pipes relative to hand brake rack auto adjuster mechanism: Flow to radiator and to heater matrix runs on left and return from radiator on the right. Can only be fitted one way but I am sure someone has managed to get this screwed up in the past.
When raising subframe in stages, you should guide the rack into hand brake lever from inside the car. Use a long flat bladed screw driver.Comment
Comment