 Tweet
Tweet
These are the official instructions from Merc for setting the Clutch Actuator.
Personally I think they're a little overkill, but you know how exact the Germans like to be! So this is how the job 'should' be done!
This should process should be carried out when the engine is Cold.
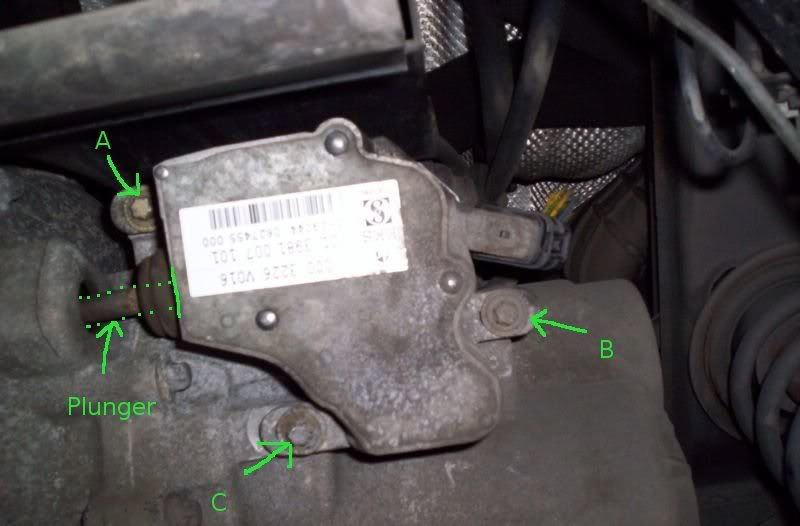
1) Before the Actuator is put in place under the car ensure the actuator 'plunger' is extending 60mm from the housing. This is the plunger in the non-extended position.
2) Put the actuator in place and loosely tighten the three E10 Torx bolts.
3) Plug in the electric motor connector
4) Using a 'Spring Balance' or appropriate tool push the actuator against the clutch with a force of 50Nm.
5) While the actuator is being held against the clutch with the above force tighten up the three E10 torx bolts in the Specific sequence order of A, B and then C as shown in the diagram.
6) Using the STAR tool carry out the "Pulse Clutch" routine from the MEG menu.
7) If the 'Pulse Clutch' sequence doesn't perform correctly or is unavailable start the engine and shift between 1st and 2nd gear ten times. Then select reverse gear and turn off engine and ignition. This whole process needs to be done with the drive wheels lifted off the ground and with no resistance.
8) With the spring balance still connected and maintaining a 50Nm pressure loosen the three Torx bolts carefully. If the 50Nm force is lost the whole process must be repeated from start.
9) Gently relieve the force from the spring balance from 50Nm to 11Nm. The actuator will move back slightly. In this new position tighten the Torx bolts again in the specific sequence of A, B and then C.
10) The clutch biting point now needs to be set. Using the STAR tool run the "Teach in clutch engagement point" option from the MEG menu.
11) Set the point limit value by using the STAR tool and running "Program Point Limit Value" from the MEG control unit menu.
12) Finally connect STAR diagnose and check for any errors.
For a DIY guide have a look here.
Personally I think they're a little overkill, but you know how exact the Germans like to be! So this is how the job 'should' be done!
This should process should be carried out when the engine is Cold.
1) Before the Actuator is put in place under the car ensure the actuator 'plunger' is extending 60mm from the housing. This is the plunger in the non-extended position.
2) Put the actuator in place and loosely tighten the three E10 Torx bolts.
3) Plug in the electric motor connector
4) Using a 'Spring Balance' or appropriate tool push the actuator against the clutch with a force of 50Nm.
5) While the actuator is being held against the clutch with the above force tighten up the three E10 torx bolts in the Specific sequence order of A, B and then C as shown in the diagram.
6) Using the STAR tool carry out the "Pulse Clutch" routine from the MEG menu.
7) If the 'Pulse Clutch' sequence doesn't perform correctly or is unavailable start the engine and shift between 1st and 2nd gear ten times. Then select reverse gear and turn off engine and ignition. This whole process needs to be done with the drive wheels lifted off the ground and with no resistance.
8) With the spring balance still connected and maintaining a 50Nm pressure loosen the three Torx bolts carefully. If the 50Nm force is lost the whole process must be repeated from start.
9) Gently relieve the force from the spring balance from 50Nm to 11Nm. The actuator will move back slightly. In this new position tighten the Torx bolts again in the specific sequence of A, B and then C.
10) The clutch biting point now needs to be set. Using the STAR tool run the "Teach in clutch engagement point" option from the MEG menu.
11) Set the point limit value by using the STAR tool and running "Program Point Limit Value" from the MEG control unit menu.
12) Finally connect STAR diagnose and check for any errors.
For a DIY guide have a look here.


 , the usual way I'm sure will suffice until you get it to somewhere that does!!


Comment